
 We've gotten lots of comments, questions, opinions and "head scratches (???)" regarding our use of culvert pipes as upright planters out in the gardens. Many previous blogs have featured our use of these planters in 2010 as seen along our entrance garden slope above. We've started repainting some of these culvert pipes recently with our 2011 colors (see yellow below). Also note in that picture (below) the bench staining operation that Dr. Gredler has established. We even acquired a new, 20' long culvert pipe (18" diameter) to make more of the same size pipes as seen below as well. Dick P., seen below, did a nice job cutting them while Rose and Urban have already started to work on "color transitioning." The cutting noise was deafening but it was nice to create two more pipe planters (with a leftover piece with undecided use). The end results will be interesting out in the gardens with five, 6' tall, 18" diameter pipes and five, 10' tall, 24" diameter pipes to prep and install. This blog is dedicated to the joys of using culvert pipe for growing plants!
 Last winter we obtained all but the two most recently created pipes from a local distributor and got lots of questions when they arrived and were staged out in the yard of the Horticulture Center (see the photo below). The idea for using these as planters was spawned when we had so much success with our upright pvc planters over the previous years. The painted pvc pipes became not only conversation pieces but worked very well as repetitive upright elements out in the garden. We've used the pvc pipes (both 4" and 8" diameter) in a similar fashion and have utilized them three of the last four years. I got to thinking, "What would be a bigger version of this same look...?". Well, corrugated steel culvert pipe was the obvious choice!
  I should say that I had never seen it used in this fashion but thought that it would not only provide a nice vertical element with significant planting space but would have that "industrial feel." Interestingly enough, when vacationing up in Door County, WI this sum
 mer, my daughter and I were driving around Washington Island and I did a double take when I saw (sure enough) a painted culvert pipe planter (4' tall and red). It looked great. We applied primer first and then three coats of exterior paint for our desired colors. The maroon ones from last year have taken primer and the new paint with no problem. Rose and Urban have done most of the painting with past help from Dr. Gredler and Maury. Has a final touch, Rose goes around with metallic silver paint and paints the rivets (cool effect).
 Of course our intent was never to fill these pipes entirely with soil. Our pvc pipe planters followed the same concept and had plastic pots
 placed 18" down (secured with inconspicuous screws) to provide ample soil for plantings without the need of filling the entire pipe. However, the scale of the culverts was challenging as we weren't sure what to use for inserts. Well, Marv and Terry came up with the idea of using plastic garbage cans. We sized up some cans that would work but then realized that their weight, when filled with soil and watered, would be a major consideration. That problem was solved when Dick Heshelman secured threaded rebar in a 'X' thru the pipe to support the bottom of the contain
 ers. It worked great and we had no problems this past year.
 The culvert pipes are then dug in the ground in a hole commesurate with the size of the pipe. Our 18" diameter pipes are "planted" 18-24" in the ground to secure them although the 24" diameter pipes were put 30-36" in the ground. The pipes were then leveled vertically and secured with tamped soils around the sides.
The final steps included filling the inserted garbage cans with a "soil-less mix" (peat moss, perlite, vermiculite) adding a slow release ferti
 lizer and soil retention crystals. See Terry below on the ladder taking care of soil preparations. Planting was the easy part and based on the final location of many of these pipes, we tried to leave some access to the pipes for watering with long watering wands. As seen in the top and bottom photos on this blog, our larger pipes became lost in a tangle of surrounding annuals and it was challenging to get to them with water. We were able to access them from behind and the watering was very extensive for
  that amount of soil. Terry figured out that the large ones took 1 minute and 45 seconds of solid watering with the watering wand until you could hear them drip thru. Overall, the culvert planters have been a nice success and while we wont use them forever, they do offer a very nice effect.
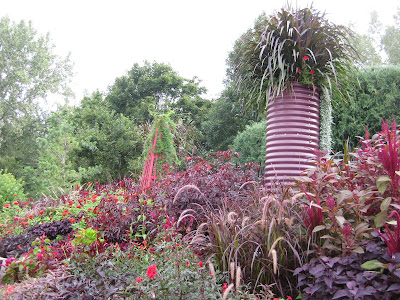


1 comment:
Love the idea but where in the world does one find a culvert for garden use? I am at a loss.
Thanks
Post a Comment